How to Delete All Old Posts On Facebook
Ever since the records of Facebook user's information being gathered as well as used for details warfare has happened, users in droves have been trying to erase their accounts or at the very least, wiping the slate clean by removing all prior Facebook posts. Nevertheless, this can actually prove to be an extremely lengthy process as you would usually have to go with each individual post you have actually ever posted as well as erase each by hand individually - How To Delete All Old Posts On Facebook.
" What?! I don't wish to that. There has to be a simpler means, right?"
Technically, yes. You can get rid of posts from your Facebook timeline from within the Facebook mobile application without the need for a third-party application. This consists of formerly deleted or hidden posts you've shared in addition to posts that you have actually been labelled in or at least your tag situated in them.
Desktop computer Facebook customers can do the exact same yet likewise have various other choices at their disposal in order to get rid of all posts from their timeline. You'll either be eliminating them manually or to speed up points up, use a third-party web browser extension like Social Book post Manager to rid on your own of feasible past embarrassments.

How To Delete All Old Posts On Facebook
First, we'll start with mobile.
Facebook: Here's Exactly how to Remove posts From Your Timeline in Bulk
Step 1: Near the top of your Facebook News Feed, tap your profile picture to visit your account.

Step 2: Scroll down and tap “Manage Posts.”

Action 3: Tap the circle to the left of each post that you wish to delete/hide from your profile.
Essential Note: You have three alternatives for getting rid of material from your profile in Bulk: You can erase old posts that you personally shared, conceal posts that you or somebody else shared, or eliminate the tags from posts that you have actually been tagged in by various other users. However, you need to complete these actions one at a time. If you wish to erase a great deal of content from your account, you'll require to develop "batches" of posts by just touching on posts for which you intend to take the exact same action. That is, you can not erase any posts you directly shared if you additionally include posts shared by others in the exact same "batch".

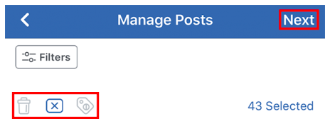
Also note, you can touch the "Filters" switch near the top-left corner of the display to filter your view to just see posts that you personally shared, only posts that you're tagged in and more.

Step 4: When you've selected several posts, tap either "Next" in the top-right corner of the display, or the 3 icons in the bottom-left corner of the screen to proceed.
Step 5: At the bottom of the screen, tap "Delete posts" "Hide from Timeline" or "Remove Tags" depending upon what you intend to do. Keep in mind: If you're trying to remove posts however the "Delete posts" option is in grey message, as opposed to black, it indicates you unintentionally touched a blog post that Facebook will not permit you to delete. Instances consist of notifications that you have actually transformed your profile or cover image and posts that you might have shared from within a Facebook game. You can just eliminate these posts from your timeline by touching the "Hide from Timeline" option.

Action 6: Tap "Delete posts" "Hide" or "OK" on the confirmation home window that appears. The home window that appears will be established by the choice you touched in Step 5 above.

REMOVE FACEBOOK POSTS in Bulk FROM WEB BROWSER
You can choose to by hand remove posts separately from your Facebook timeline yet allow's be real here, that's not why you're reading this write-up. So to speed things up and delete entire years from Facebook in one fell swoop, you'll need to download and install a browser extension for Chrome. Regrettably, there are no Safari extensions available for use right now. These extensions can remove years of history instantaneously with a click of a switch, so ensure to archive anything you want to conserve in the past hitting remove.
For this tutorial, we're mosting likely to concentrate on Social Book Post Manager as our bulk deletion extension of choice. This will make the whole removal procedure instead streamlined and definitely much quicker for those who have years worth of posts to eliminate.
SOCIAL PUBLICATION post MANAGER EXPANSION
Prior to you erase your posts, I will certainly repeat the value of initial producing a backup of your Facebook data. With this tool, once the info is gone, it's absolutely gone. This information not only consists of every one of your posts but likewise your pictures and also videos, messages as well as chat discussions as well as all details that you've provided in your profile's Regarding section.
In order to produce a back-up:.
1. Head over to your General Account Settings screen.
2. While you have this screen brought up, there will be a link entitled "Download a copy of your Facebook data" at the bottom.
3. Click the Download a copy link and comply with the triggers. Facebook will certainly begin developing a backup of all your information that will certainly be available for download when full. When the download prepares, Facebook will certainly send an e-mail to your registered e-mail address alerting you of its completion and also availability.
When you have your data back-up:.
1. Install the Social Book post Manager extension, head back to Facebook, and also go to your Activity Log. The Task Log can be accessed by clicking the down arrow to the right of the enigma symbol in the upper-right portion of the Facebook navigating header. Open it as well as situate Activity Log from the drop-down menu.
2. The Activity Log web link will take you to a page that displays every one of your Facebook task (for this reason the name). You will certainly see all the buddies that you've added along with all the posts and also remarks that you have actually both produced and liked. In the Filter section on the left-hand side, pick the filter you wish to erase from, in this situation, click "posts".
3. Now open up the Social Book post Manager extension by clicking the symbol at the top-right of your Chrome web browser.
4. As soon as the expansion is opened, you'll be presented with a list of filters that you can use to erase posts on Facebook.
The filters will certainly establish which posts are to be gotten rid of as well as you can also filter them by particular years, months, and also also those including specific strings. A "Prescan on Page" choice is readily available to you if you desire to utilize it. This will cause the expansion to motivate you of which posts will certainly be eliminated before your verification. If you accept the chosen posts for removal, you can click to verify and also see those posts go away. Nevertheless, there have actually been some records that when utilizing the "Prescan on Page" option with populous activity logs may create difficulties.
5. As soon as every one of the posts you have actually chosen for deletion have been selected, click the OK switch to close the alert, examine the activity log, and also if pleased with the option, click the Confirm to erase switch situated on top of the page.
If you're not delighted with the currently selected posts targeted for elimination, you can refresh the web page (I favor tapping F5 myself) as well as see the task log repopulated as it was previously.
" What?! I don't wish to that. There has to be a simpler means, right?"
Technically, yes. You can get rid of posts from your Facebook timeline from within the Facebook mobile application without the need for a third-party application. This consists of formerly deleted or hidden posts you've shared in addition to posts that you have actually been labelled in or at least your tag situated in them.
Desktop computer Facebook customers can do the exact same yet likewise have various other choices at their disposal in order to get rid of all posts from their timeline. You'll either be eliminating them manually or to speed up points up, use a third-party web browser extension like Social Book post Manager to rid on your own of feasible past embarrassments.
How To Delete All Old Posts On Facebook
First, we'll start with mobile.
Facebook: Here's Exactly how to Remove posts From Your Timeline in Bulk
Step 1: Near the top of your Facebook News Feed, tap your profile picture to visit your account.
Step 2: Scroll down and tap “Manage Posts.”
Action 3: Tap the circle to the left of each post that you wish to delete/hide from your profile.
Essential Note: You have three alternatives for getting rid of material from your profile in Bulk: You can erase old posts that you personally shared, conceal posts that you or somebody else shared, or eliminate the tags from posts that you have actually been tagged in by various other users. However, you need to complete these actions one at a time. If you wish to erase a great deal of content from your account, you'll require to develop "batches" of posts by just touching on posts for which you intend to take the exact same action. That is, you can not erase any posts you directly shared if you additionally include posts shared by others in the exact same "batch".
Also note, you can touch the "Filters" switch near the top-left corner of the display to filter your view to just see posts that you personally shared, only posts that you're tagged in and more.
Step 4: When you've selected several posts, tap either "Next" in the top-right corner of the display, or the 3 icons in the bottom-left corner of the screen to proceed.
Step 5: At the bottom of the screen, tap "Delete posts" "Hide from Timeline" or "Remove Tags" depending upon what you intend to do. Keep in mind: If you're trying to remove posts however the "Delete posts" option is in grey message, as opposed to black, it indicates you unintentionally touched a blog post that Facebook will not permit you to delete. Instances consist of notifications that you have actually transformed your profile or cover image and posts that you might have shared from within a Facebook game. You can just eliminate these posts from your timeline by touching the "Hide from Timeline" option.
Action 6: Tap "Delete posts" "Hide" or "OK" on the confirmation home window that appears. The home window that appears will be established by the choice you touched in Step 5 above.
REMOVE FACEBOOK POSTS in Bulk FROM WEB BROWSER
You can choose to by hand remove posts separately from your Facebook timeline yet allow's be real here, that's not why you're reading this write-up. So to speed things up and delete entire years from Facebook in one fell swoop, you'll need to download and install a browser extension for Chrome. Regrettably, there are no Safari extensions available for use right now. These extensions can remove years of history instantaneously with a click of a switch, so ensure to archive anything you want to conserve in the past hitting remove.
For this tutorial, we're mosting likely to concentrate on Social Book Post Manager as our bulk deletion extension of choice. This will make the whole removal procedure instead streamlined and definitely much quicker for those who have years worth of posts to eliminate.
SOCIAL PUBLICATION post MANAGER EXPANSION
Prior to you erase your posts, I will certainly repeat the value of initial producing a backup of your Facebook data. With this tool, once the info is gone, it's absolutely gone. This information not only consists of every one of your posts but likewise your pictures and also videos, messages as well as chat discussions as well as all details that you've provided in your profile's Regarding section.
In order to produce a back-up:.
1. Head over to your General Account Settings screen.
2. While you have this screen brought up, there will be a link entitled "Download a copy of your Facebook data" at the bottom.
3. Click the Download a copy link and comply with the triggers. Facebook will certainly begin developing a backup of all your information that will certainly be available for download when full. When the download prepares, Facebook will certainly send an e-mail to your registered e-mail address alerting you of its completion and also availability.
When you have your data back-up:.
1. Install the Social Book post Manager extension, head back to Facebook, and also go to your Activity Log. The Task Log can be accessed by clicking the down arrow to the right of the enigma symbol in the upper-right portion of the Facebook navigating header. Open it as well as situate Activity Log from the drop-down menu.
2. The Activity Log web link will take you to a page that displays every one of your Facebook task (for this reason the name). You will certainly see all the buddies that you've added along with all the posts and also remarks that you have actually both produced and liked. In the Filter section on the left-hand side, pick the filter you wish to erase from, in this situation, click "posts".
3. Now open up the Social Book post Manager extension by clicking the symbol at the top-right of your Chrome web browser.
4. As soon as the expansion is opened, you'll be presented with a list of filters that you can use to erase posts on Facebook.
The filters will certainly establish which posts are to be gotten rid of as well as you can also filter them by particular years, months, and also also those including specific strings. A "Prescan on Page" choice is readily available to you if you desire to utilize it. This will cause the expansion to motivate you of which posts will certainly be eliminated before your verification. If you accept the chosen posts for removal, you can click to verify and also see those posts go away. Nevertheless, there have actually been some records that when utilizing the "Prescan on Page" option with populous activity logs may create difficulties.
5. As soon as every one of the posts you have actually chosen for deletion have been selected, click the OK switch to close the alert, examine the activity log, and also if pleased with the option, click the Confirm to erase switch situated on top of the page.
If you're not delighted with the currently selected posts targeted for elimination, you can refresh the web page (I favor tapping F5 myself) as well as see the task log repopulated as it was previously.